 |
| What you will need- Rotary cutter with a good blade, cutting mat, scissors, lots of pins and a piece of glass. You don't need a cutting mat this large if you don't already have one. You can get smaller ones or even use cereal boxes. |
 |
| You can use scissors and a measuring tool to cut the squares, but I had a piece of glass cut out to measure 4 1/2" by 4 1/2" at Lowe's for $3 and it made this step a whole lot easier. It's a sure way to get all the squares perfect. |
 |
| Start cutting out the squares from your clothes. |
 |
| Pick the spot that you want to be your square and place the glass over it. That is another reason the glass is nice for this step, you can see exactly what you will end up with. |
 |
| Cut around the piece of glass. |
 |
| If you are choosing a piece that has buttons, snaps, zipper, or a collar- make sure to put a back on it so you can actually open them on your quilt and it won't open up to batting. There's a picture of what I mean three pictures down. |
 |
| Pin the front of the square to the back. Not all squares will need pins. Some will just be one piece of fabric, but I wanted to show this example |
 |
| If you cut a good square and pin when necessary, the sewing part will be much easier (trust me!) |
 |
| Here is where you can see why you need a back to squares with an opening. This square had a zipper and you can actually use it when the quilt is finished. You wouldn't want that to open up to the inside of the quilt. |
 |
| Here is another example of a square. This was just a plain Onesie and since the material is a little thinner and I don't like to mess with interfacing, I just double it up with another piece. I pinned the printed square on top of the solid one to make it a little easier to work with while I sew. You should be able to get as many squares as you want from your clothes. I usually get three to use on the quilt from each item. |
 |
| If you have details that will be close to the seam (such as bows), pin them in so they don't get hidden in your stitching. Allow for 1/4" seam. |
 |
| After you cut what seems like an endless supply of squares, you are now ready to arrange them.I don't count the squares as I cut them, I just cut the ones that I KNOW I want and determine the size of the quilt accordingly. I swear, when I have a lot of these to make everything in my head becomes a square! |
 |
| Start arranging them. Pick a spot safe from meddling kiddos and curious pets. |
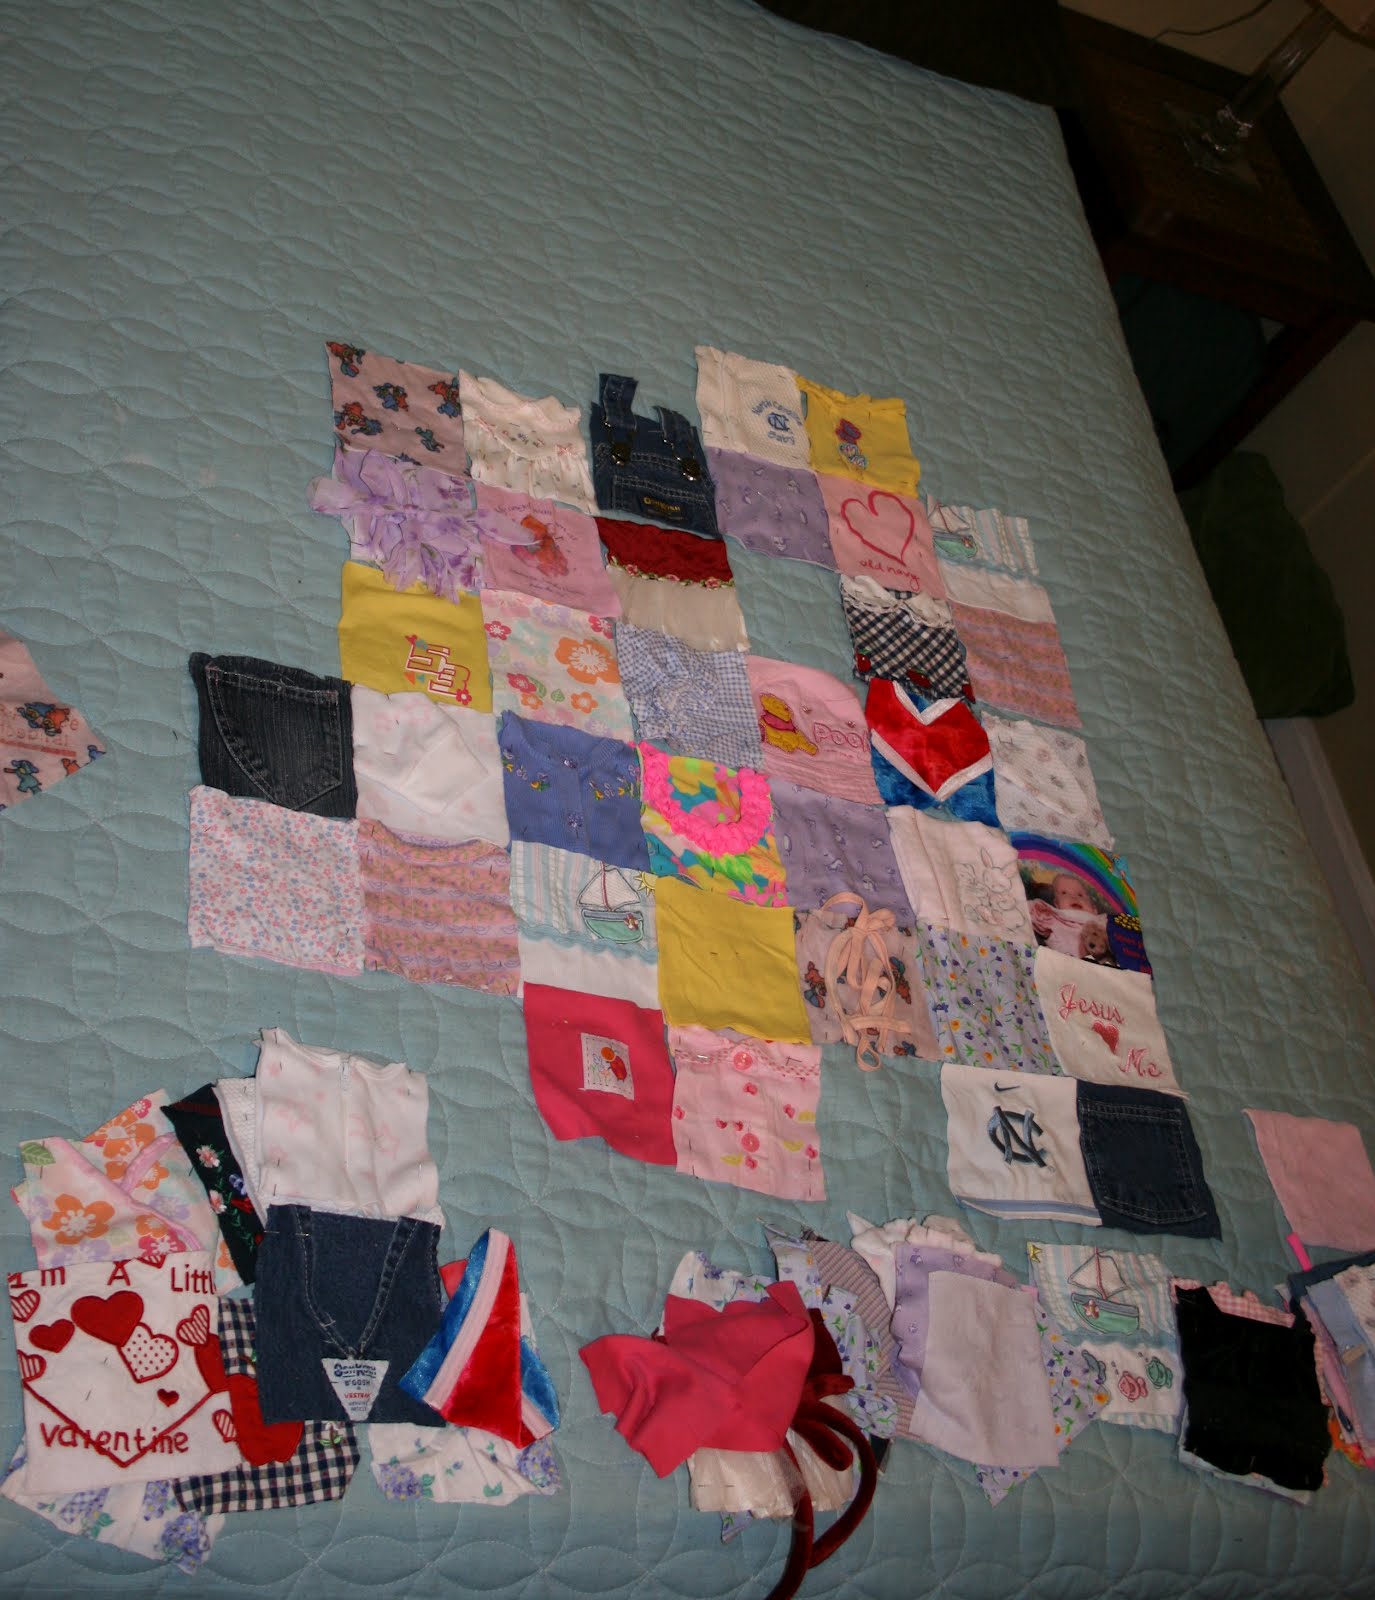 |
| It's a "put this here, move it there" kind of process. |
 |
| Almost got it..... I usually have 2-3 squares per outfit to stretch the quilt out to a good size and even out the colors. I highly recommend saving all your scraps in case you come up short, mess up a square, or just want to change one. The size of the quilt completely depends on how many squares you have. You can arrange them any way you want. If you don't have many clothes and want to make your quilt bigger, just buy some fabric. The idea is still there and it will still be a cherished keepsake. |
 |
| There! Got it! At this point, I take a picture of the quilt laid out for reference. Sometimes I get the order mixed up and it's nice to be able to look at the photo as a guide. Then just stack them in order to be ready for the next step-sewing! |
 |
| Sewing them together is a fairly simple process. This is where all your faithful pinning and careful cutting comes into play. A memory quilt was actually my very first sewing project so don't think you have to have experience to make one of these! First lay out your first two squares. |
 |
| Then place the right sides together |
 |
| Sew the seam with a 1/4" allowance. Never mind the toy phone. It's not crucial to this step. |
 |
| Fold out and you have your first seam! Yay! |
 |
| Repeat this step until you have your first row sewn together. |
 |
| Keep sewing in the same method until you have all your rows done. I try to stack them in order, but it never fails that they get switched around which is why the photo you took will come in handy. |
 |
| Now you are ready to lay out your rows. It's very similar to sewing those first two squares, just on a bigger scale. |
 |
| Fold the top to the bottom and get ready to pin, pin, pin. |
 |
| Start pinning the bottom of the top row to the top of the next row down. Make sure you have the pins on the correct side to be sewn so you don't sew a row upside-down. |
 |
| Match your seams and make sure to pin! I usually put a pin on each square where the seams meet (so where my thumb is in the picture, there is another pin). If after you sew the rows together, the squares aren't perfectly matched, don't worry. You can correct that when you tie the quilt during one of the final steps (never fear-there's a picture to explain this-lol) |
 |
| When I sew, I always have company. I highly recommend having your crew near. Makes it all the more fun! |
 |
| Now you have two rows sewn together. Keep repeating the "fold, pin, sew" process until you have everything sewn together. |
 |
| Tah-Dah!!! |
 |
| If you chose to keep sleeves, footies, or other hanging items to have on your quilt, now is a good time to sew them down so they don't flap around when your quilt is finished. I sew a small line on the inside of the sleeve so I can put my fingers into the opening, but the sleeve isn't sewn shut. I LOVE being able to feel how small the openings were...... |
 |
| You can't really see where I sewed, but it was on the zig-zag. I hope that makes sense? |
 |
| Now it's time to put it all together with the back and the batting. First lay out your batting. |
 |
| Place the backing on top of the batting. If your backing has a side, make sure you put the quilt and the backing right sides together. I had this one monogrammed with the baby's name (you can't see it) so its facing up. |
 |
| Put your quilt on top of the backing. You will be sewing this all together inside out (with an opening) and you will turn it right side-out when finished. |
 |
| Pin all the way around your quilt. Don't be stingy with the pins! It will help you a ton. Try not to stretch the quilt as you pin, it changes the shape. |
 |
| Pick where your opening will be. Try to pick good strong material for this spot because when you turn it right-side out, it will get a little stretched and worked. For this one I chose where fleece and a good heavy cotton are sewn. |
 |
| (Sorry for the terrible picture!) Start sewing around your quilt. Start where you want your opening to be and make sure to stop about 5 1/2" before you get all the way around. |
 |
| Can you see where the opening is? I used black thread. |
 |
| Before you turn it right-side out- double, triple, and quadruple check for any pins. I grab all around the edges and seams just to be sure I've got them all! I would rather be the one getting stuck than the person using the quilt! |
 |
| Trim the batting and backing. |
 |
| Now to turn it right side out! Yay! Just keep pulling and tugging as carefully as you can and with a little work............ |
 |
| Voila!!! |
 |
| Now it's time to tie the quilt. Pick a good, comfortable spot. I like the dining table. |
 |
| You will need a needle, scissors, pliers (sometimes the material is so thick that it's hard to pull the needle through so the pliers help!) and embroidery floss. I use all six threads of embroidery floss. You can use one color for the whole thing or alternate several. Whatever you choose. The coffee is optional. |
 |
| Pass the floss through the front at the corner of the square |
 |
| Bring it up through the back and cut it off |
 |
I tie three knots and tie at EVERY corner. You may not have to tie at every corner, you probably could get away with every two or three, but I think it looks better at every one. Then trim the tie to about 1/4"-I forgot to get a picture of that. |
 |
| If your squares don't match up perfectly, this is where you can correct that. See how these don't meet up? Just put your floss at the points you want to bring together. |
 |
| Then tie nice and tight and there you go! All the differences in material for these quilts make it hard to make them perfect. |
 |
| Last step! It's now time to stitch your opening closed. You will be using a blind stitch. If you don't know what that is, here's a good video tutorial |
 |
| Make sure you pinned it good for a nice even line and start sewing it closed. |
 | ||
That's it! You are done!! I would love to see what YOU'VE made! Send me
pictures and if you have any questions or need more pictures or a step
please contact me at AndreaLarsen22@Gmail.com.
|


This comment has been removed by a blog administrator.
ReplyDeleteThis comment has been removed by a blog administrator.
ReplyDeleteThis comment has been removed by a blog administrator.
ReplyDeleteThis comment has been removed by a blog administrator.
ReplyDeleteGreat Tutorial, Ive been trying to find one to do this and yours is the best one I have came across. Thank you, Wish me luck!! :)
ReplyDeleteThank you!!! I hope it helps you make a quilt for your little one!!
DeleteThis comment has been removed by a blog administrator.
ReplyDeleteThis comment has been removed by a blog administrator.
ReplyDeleteThis comment has been removed by a blog administrator.
ReplyDeleteI couldn't refrain from commenting. Perfectly written!
ReplyDeleteHere is my web blog; アバクロ tシャツ
This comment has been removed by a blog administrator.
ReplyDeleteThis comment has been removed by a blog administrator.
ReplyDeleteThis comment has been removed by a blog administrator.
ReplyDeleteThis comment has been removed by a blog administrator.
ReplyDeleteThank you so much for taking the time to post this. I have made two quilts with your advice that turned out wonderful!
ReplyDeleteYou have?!?! That makes me so happy!
ReplyDeleteI will be making my youngest daughter a memory quilt for christmas . This is so easy to follow thanks!
ReplyDeleteGREAT Tutorial!!! Thank you so much for posting this. I was just asked to make one of these for a friend two days ago. And while it's a project that's been on my own to-do list, I really had no clue how to go about it. Thanks for making it very easy to understand.
ReplyDeleteHi, how large is the quilt when your done? I plan to make my son's (over 30) a memory quilt of clothing I kept since they where young.
ReplyDeleteThanks for sharing your pattern.
Most quilts that I make are around to 40 inches by 44 inches. If you are doing 4 inch squares, that would be 10 squares by 11 squares. You can do different sized squares and make it as big as you wish. If you want it bigger, but don't have enough clothes, you can always add solid or printed fabric. Brenda, thank you SOOO much! I am so glad that people can use my tutorial!!!
ReplyDeleteAmazing tutorial. I'm going to attempt it as my first sewing project (too ambitious?!). I'll let u know how it goes...
ReplyDeleteThank you! Not too ambitious at all! A memory quilt was the first thing I made using my sewing machine!
DeleteAmazing instructions!! I'm almost done with my quilt for my 7 month gold's first Christmas present.... it's my first sewing project ever, and your blog helped me SO much. Thank you!!! :-D
ReplyDeleteI am so glad!! I made this tutorial while I was pregnant with my third baby and NEVER imagined that anybody would even see it!! Yay!
DeleteI just finished making 2 quilts for my daughter for Christmas using her 2 boys' sleepers. The quilts turned out beautifully thanks to your wonderful tutorial! I kept referring back to it many times while I was making the quilts, it was such a help. Thanks for taking the time in making such a great tutorial. Wish I could show you a picture but not sure how to do that.
ReplyDeleteI would LOVE to see a picture of the quilt you made!! You could email it to me! AndreaLarsen22@gmail.com So glad that people are seeing this and making quilts!!
DeleteI want to start my son's quilt this weekend but am unsure what good quality fabric to use for the backing. I would appreciate any tips!
ReplyDeleteHi Jessica!! So sorry it took me so long to get back, I didn't even see any comments on my tutorial! I like Muslin to back quilts. You can find a variety of quality, but most fabric stores carry it and they vary in width up to 108 inches wide! Just feel them until you find one you like. It can be a bit pricey though! I actually use flat sheets to back my quilts now. I can find nice quality as well as a variety of colors. Sorry it took me so long to reply! I didn't realize that anybody was commenting. Thanks for checking out my tutorial!
Deletethnx for the tutorial! I just made my first quilt ever, using this tutorial. my 4 yo loves her baby clothes quilt :)
ReplyDeleteAwesome!!! I still can't believe that people are using my tutorial!! Love it!
DeleteI really appreciate you taking the time to post your tutorial... Thank you for sharing. I've been wanting to do thus for years, and have saved clothes for my 15 to son since the day he was born. Your tutorial was excellent! I'm finally in my way, thank you, thank you, thank you
DeleteI'm so glad!!! I kind of made this on a whim and am SOOO glad that people are using it!! Good luck!! Feel free to email me if you have any questions!
Deletehi, brill tutorial planning to start making my daughters this week im just unsure what backing to use as in what weight is best? could you help me please?
ReplyDeleteI actually have the best luck using flat sheets as my backing. It's the best quality for the best price and I find they are wide enough for what I need while giving me a range of colors. I've also used Muslin, but I am not sure of the weight? I would say trust your touch, if it feels good-use it. I hope that helps!!!
Deletebrill, thanks a lot! really helped. struggling to find a measurement like the glass piece you used as i live in the uk so im not sure where i could get one.
DeleteHi... this is a great tutorial, thanks!
ReplyDeleteI'm a little confused by the tying of the corners together - does this mean there is a visible knot and threads ends in each corner of the quilt? Or is it done on the reverse side before turned out? Thanks! :)
Thank you Erin!
DeleteThere will be a visible knot and threads at each corner because I use the "pillowcase method" to put these quilts together. It's very simple and turns out quite cute. The knots are what hold the back and the front together. If you give me your email address I can email you a close-up of what the threads look like on a finished quilt!
Sorry for the slow reply! That would be wonderful, thank you Andrea :)
Deleteerinlouise86@hotmail.com
Can I ask what backing did you use and do u need anything between quilt n backing to make it a bit thick ? Thnks
ReplyDeleteHey! I actually use flat sheets for my backing since I can get the widest material and colors to choose from at a great price. You could also use Muslin found at most fabric stores. In the middle, I use cotton batting. You should be able to see it in the pictures what it looks like? If you want to email me, I can send you a picture!
DeleteThanks to stumbling across your blog, I finally made a memory quilt for my son and next, I'll do one for my daughter because I love how the first one came out. This is something I've been meaning to do for almost 14 years - so thank you for sharing. :)
ReplyDeleteSuperb tutorial, I dunno if I'll ever make one coz I'm always running out of energy n time after my house chores but I had to say that ur instructions n pics make me feel that it's possible :) thank you..
ReplyDeleteExcellent tutorial! Just bought a sewing machine and this will be my first project :-) wish me luck!!
ReplyDeletethank you for the great step by step process.., I want to do this for my son 1 year present.
ReplyDeleteI love this tutorial! I just sewed my first seam today to test out my new sewing machine (this is my first time sewing anything lol). My first question is when you sew the seem do you need to back stitch it? Thanks!
ReplyDeleteYou are going to love sewing a memory blanket!! Yes, you do need to add a backstitch at the beginning and end of your line. Thank you for asking. I meant to add that to the tutorial!
DeleteI think the hardest part so far is sewing the rows together, I guess it's not hard but some of my seams are off by alot no matter how well I pin it. Other than that it's coming together really well. I guess I can't expect it to be perfect if its my first project!
DeleteAlso what seam allowance when sewing around the whole quilt? 1/4" as well. Thanks :)
ReplyDeleteThis comment has been removed by a blog administrator.
ReplyDeleteOur grand baby has different sized designs on each shirt. Is it possible to incorporate different sized squares? Thank you
ReplyDeleteI would imagine so when assembling do like a game of tetris and move til it all fits?
DeleteAmazing tutorial. One of my best friends passed away and her daughter asked me to make a memory blanket for each of her two sons using her mothers clothes. I had no idea how to do this and searched for tutorials. I looked at several and yours was the easiest to use. I have kept it open on my computer and referred back to it as I sewed. Thanks so much for making it so simple. I am adding a picture of my friend to the blanket using transfer paper. I think the boys will cherish these blankets.
ReplyDeleteWhat a great tutorial - I can't wait to get started. :)
ReplyDeleteVery nice tutorial; I've had the items to make a quilt for a friends grand-daughter since April '14 and am still a little 'scared' to start. Most of the cloths are a knit-stretchy. Using a cotton fabric is OK for the backing material?
ReplyDeleteI am making a memory quilt for a friend from her sons fist year oneses, She would like it to be a twin size quilt do you no the measurements for that size?
ReplyDeleteAmazing tutorial. I am gonna try this. If possible can make a video aswell please?.
ReplyDeleteI love this!! Wanting to make a memory quilt from my grandson's personalized clothing. He's only 3 1/2, so I am trying to decide when to start this. Thank you for the info!!
ReplyDeleteThis is exactly what I was looking for!
ReplyDeleteCan I do this with a cheap portable sewing machine? Or do you think I'll have problems with the thickness of the fabrics when I put it all together?
I've always wanted to make a memory quilt and now I'm 30 want to do one with squares of my favourite old t-shirts. I can't sew and have no sewing machine, but I think my Mum would be thrilled to help me attempt a sewing project.
ReplyDeleteI love this tutorial! Not many sewers make these tutorials very easy to understand, but you accomplished it! Thank you for posting this. I feel like I can do this!!!
ReplyDeleteMy DIL just asked me to make two quilts from my two granddaughters baby clothes. I had no idea how I was going to even start! Your tutorial is a godsend to me! Thank you for putting this on Pinterest! Ditto the above comment.
ReplyDeleteThis web site is actually terrific and wonderful data perhaps there's and searching thus charming... I look and feel smart to usually be here... Keep sharing kickshaws with buddies.. Thanks meant for sharing...
ReplyDeleteEthnic Wear For Kids
Thank you for the detail tutorial. I am able to start making this as my first sewing project!Not sure If you will ever read this comment (since the post was from 5 years ago). But in case you do, I want to say thank you!
ReplyDeleteSally Nip